10 Photography Terms You Need to Know

10 Photography Terms You Need to Know
I was writing my blog for this week and ended up using a lot of technical photography terms that I realize some of you may not know. So, I’ve delayed that blog and instead I have put together a list of 10 photography terms you need to know. With the new cell phone cameras these days, knowing what each of these terms are can help you take better photos even with your phone! I could write an entire blog post about each of these terms, and maybe I will someday, but today I’ll just go over each one briefly to give you a general idea.
First, Let’s Review Basic Camera Parts
If you break down a camera into its most basic parts, it’s really quite simple to get a photograph. All you need is a box with a hole, some light, and something to capture your image (i.e. photo paper, film, or a digital sensor). You can easily make your own “pinhole” camera at home with pretty much anything – here’s a DIY tutorial for one made from a Pringles can!
Cameras today are much more sophisticated but they follow the same basic principle. It’s a box with a hole and a sensor that records the information and saves it on a memory card.
1. TLR, SLR, DSLR, and Mirrorless Cameras
TLR stands for Twin Lens Reflex, SLR stands for Single Lens Reflex, and DSLR is Digital Single Lens Reflex.
Twin lens reflex is what was used in much older cameras, where there are two light paths: one from the lens onto the film, and the other from the lens to the viewfinder. Since the two lenses are positioned differently, you can’t see exactly what is being captured on the film. The final image was often much different than what you were seeing when you took the picture.
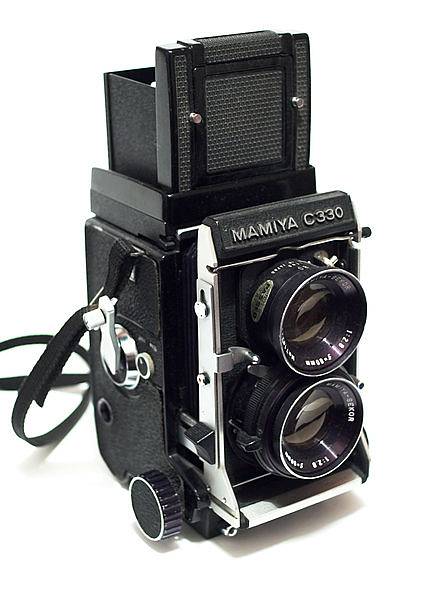
SLR cameras were first described in 1861, but they weren’t fully developed (ha, photography pun!) until the 1930s. These cameras use mirrors to direct the light from a single lens to the viewfinder, and then the mirror system flips up to get out of the way and capture the image on the film, allowing for the photographer to see exactly what is going to be captured on film.
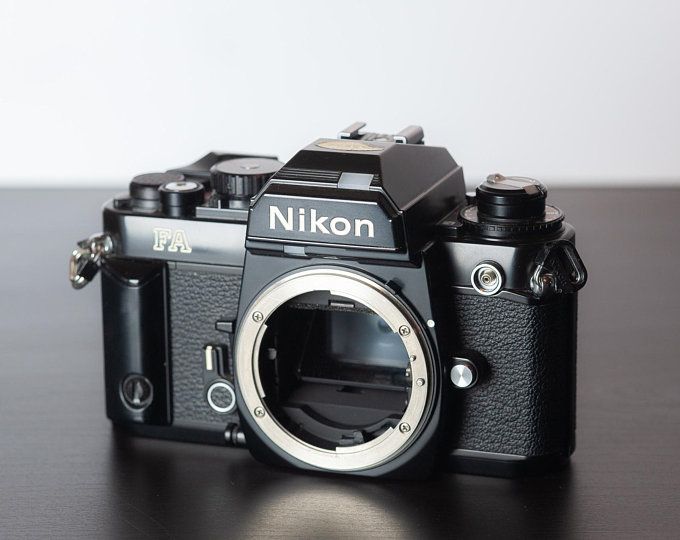
DSLR is just a digital version of the SLR, where the light is captured on a digital sensor, rather than a piece of film.
There’s a new type of camera out there known as a “mirrorless” camera. Today’s sensors are so good that we no longer need the mirror system to be able to view what the lens is seeing and the sensor can digitally send the image to the viewfinder. These cameras are much lighter than DSLRs and can take burst photos much more quickly since the camera doesn’t have to wait for the mirrors to flip up and down for each shot. I’m a bit old fashioned and I like the mirror view better than the digital view, so I’ll stick with my DSLR for now.
2. Shutter
Think of the shutter as a door that opens and closes. When the door opens, it lets in light from the outside, and when it closes, no light can get in.
3. Shutter Speed
Shutter speed is how quickly that door opens and closes. If you leave it open for a long time, more light will be able to get in, and if you open and shut it really quick, there is only a little amount of time that the light is allowed in.
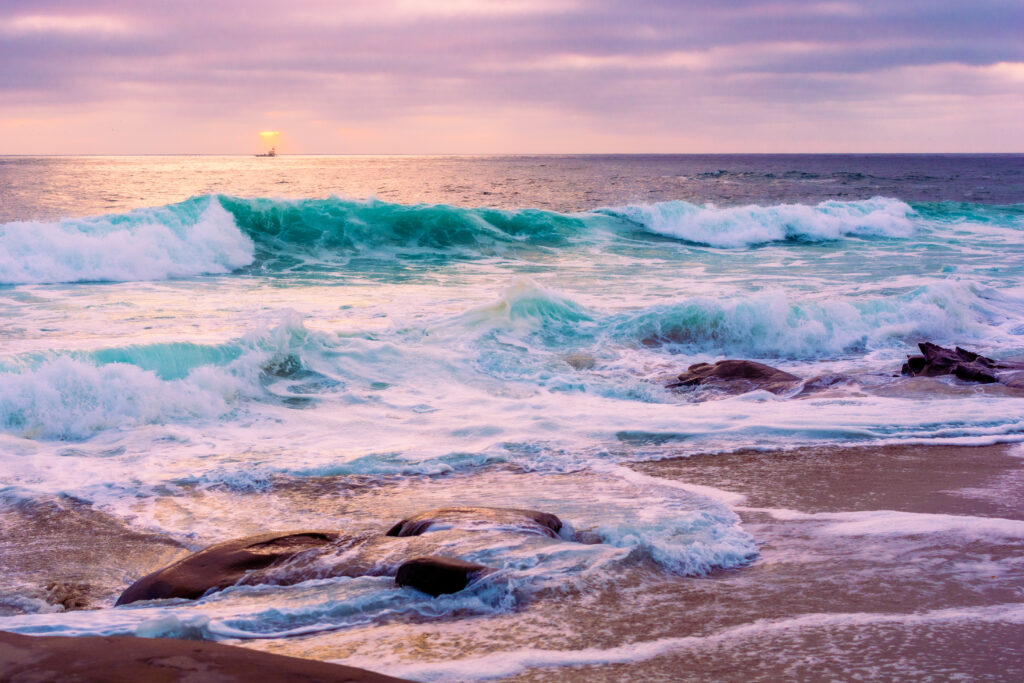
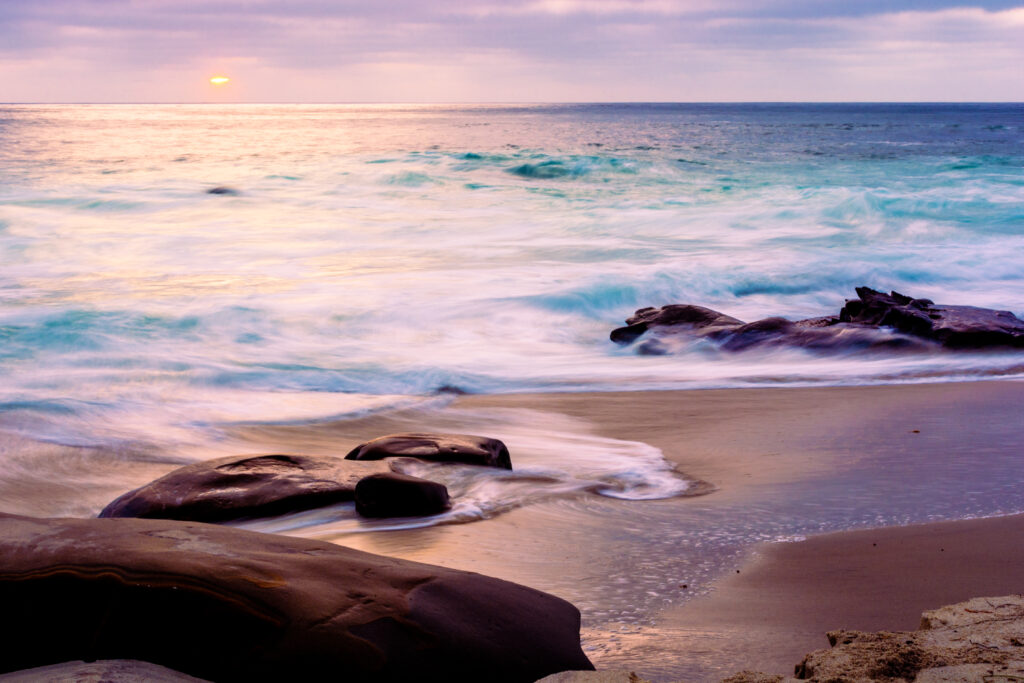
This is measured in seconds or fractions of seconds on a camera. For a really bright, sunny day, you want that door to open and close really quickly, because there is already a lot of light, so your shutter speed might be 1/1000 or one one-thousandth of a second. If you want to capture blurring motion (like car headlights driving down a highway at night or if you want to create a smooth waterfall/wave effect), you can lower that speed so your shutter is open for more time. I took these two photos in the same spot within a few minutes of each other at Windansea beach in San Diego recently. One of them had a fast shutter speed and I caught all of the detail in the waves, and the other I slowed down the shutter speed to create a blurry effect in the waves. A general rule is that if your shutter speed is slower than 1/60, you should be using a tripod, otherwise the motion of just holding the camera will make your whole image blurry.
4. Aperture
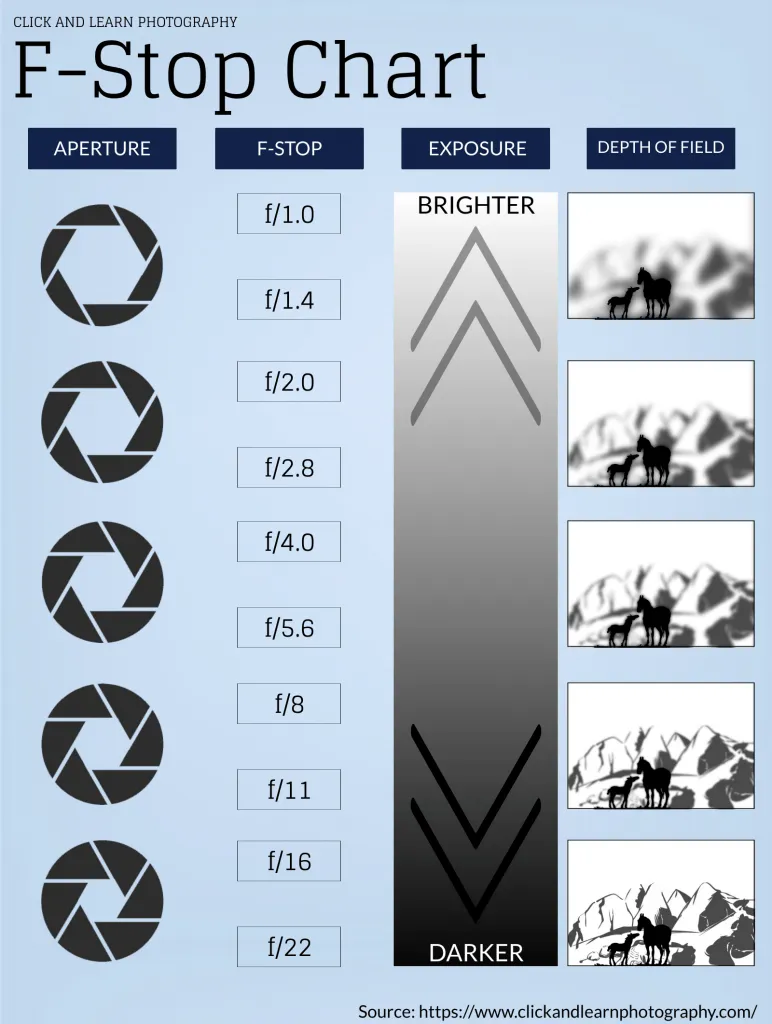
The aperture is the other component of the shutter. This determines how wide that shutter will open and is measured in what are called f-stops. Lenses will have a marking on them telling you what the lowest f-stop will be, or it will give an ideal range. F-stops involve a lot of math that I won’t go into, but generally, the higher the number, the smaller your aperture is and less light will get in. Lower f-stops will open the aperture wider and will let more light in. Aperture also controls depth of field, which I will describe in #8.
Lenses with a lower f-stop limit are better for portrait and product photography, whereas larger f-stops are better for landscapes.
5. ISO
ISO is often an overlooked setting on cameras and was used to refer to the sensitivity of film, or how well it absorbed light. On digital cameras, it refers to the sensitivity of the camera’s sensor. When you use a higher ISO film, you would tend to notice more “grain” in your photos. In digital photography, this translates to noise in your image.
I tried to do a quick test of extreme ISOs on my DSLR and I didn’t see a huge difference in noise between 200, 800, and 2540. I took 3 photos where all settings were the same (f/2.8 aperture and 1/60 shutter speed) and I just changed ISO between the three. I then zoomed in to the same tiny corner of all 3 photos to check the noise. Honestly, I’ve always been afraid of increasing the ISO because I don’t like noisy photos, but after seeing this I might kick it up a notch because I’ve been having trouble in low light situations recently! I definitely don’t think I would ever increase my ISO above 800 when shooting normally though. Generally, your ISO can be very low (100 or 200) outside on a bright sunny day, and you can go higher for darker situations and indoor shoots.
What do you think? I can’t see an obvious difference…

6. The Exposure Triangle
The exposure triangle is simply a combination of having the correct shutter speed, aperture, and ISO for your particular situation to get the perfect exposure.

7. Focal Length
The focal length is set by both the lens and the sensor size. I won’t go into different sensor sizes in this blog, so for now we will just focus (ha, another photography pun!) on the lens. There’s more math involved here, so I’m just going to simplify it by saying the focal length is the distance in mm between the lens and the camera’s sensor. This controls how close or how far away from your subject you need to be. A smaller focal length will create a wide-angle view, so people will often use lenses with a 10mm focal length to take photos of a house being put up for sale. The wide angle allows you to go into a small room and still capture a wide view of the room. A lens with a long focal length, often referred to as a telephoto lens, allows you to be further away from your subject and is good for wildlife or sports photography. Common telephoto lenses go up to 200 or 300mm, but there are professional lenses that go up to 800mm – you can buy one here for the low, low price of $16,299.95. This is the “zoom” feature that is on any digital camera and is referred to as “optical zoom.” Your cell phone or some digital non-SLR cameras will often also have additional “digital zoom” to zoom in further than the focal length of the camera. The only thing digital zoom does is crop your photo, so I would recommend never going into digital zoom territory. You can crop your photos yourself later.

8. Depth of Field
Depth of field is the distance between the furthest and the closest objects that are in focus in your photo. Think of a photo as a series of slices: the closest slice to you might be some flowers or tall grass, the next slice has the person you’re photographing, and other slices behind the person might be some trees or a mountain. If all of those slices are in focus in your photo, that is a greater depth of field. If only one slice (hopefully the person you’re photographing) is in focus, that is a narrower depth of field. This is controlled by the aperture: larger f-stops like f/22 (i.e. smaller openings) have a greater depth of field, so more of the photo is in focus. This is good for landscape photos when you want to get an entire scene in focus. Smaller f-stops like f/2.8 (i.e. larger openings) have a narrower depth of field, so just a small slice of the scene is in focus.
9. Rule of Thirds
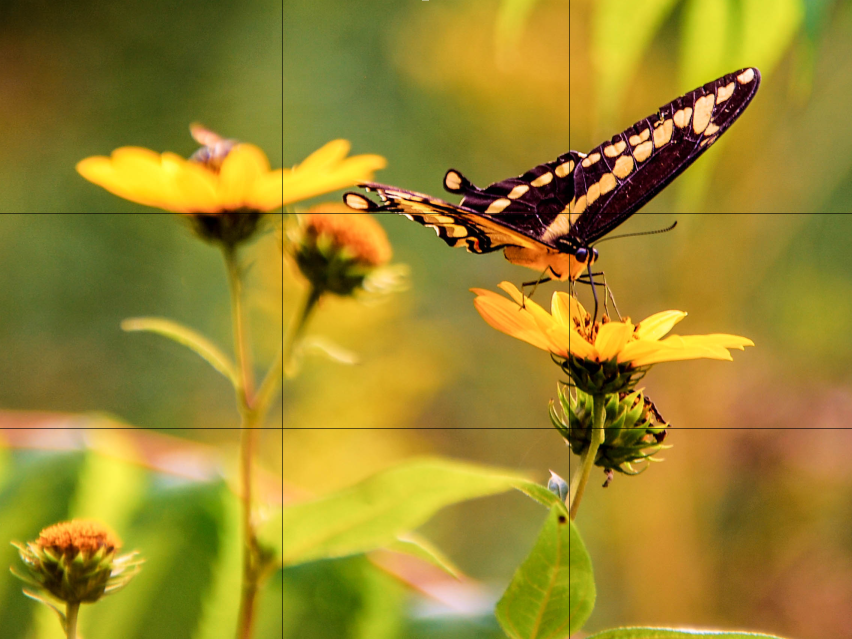
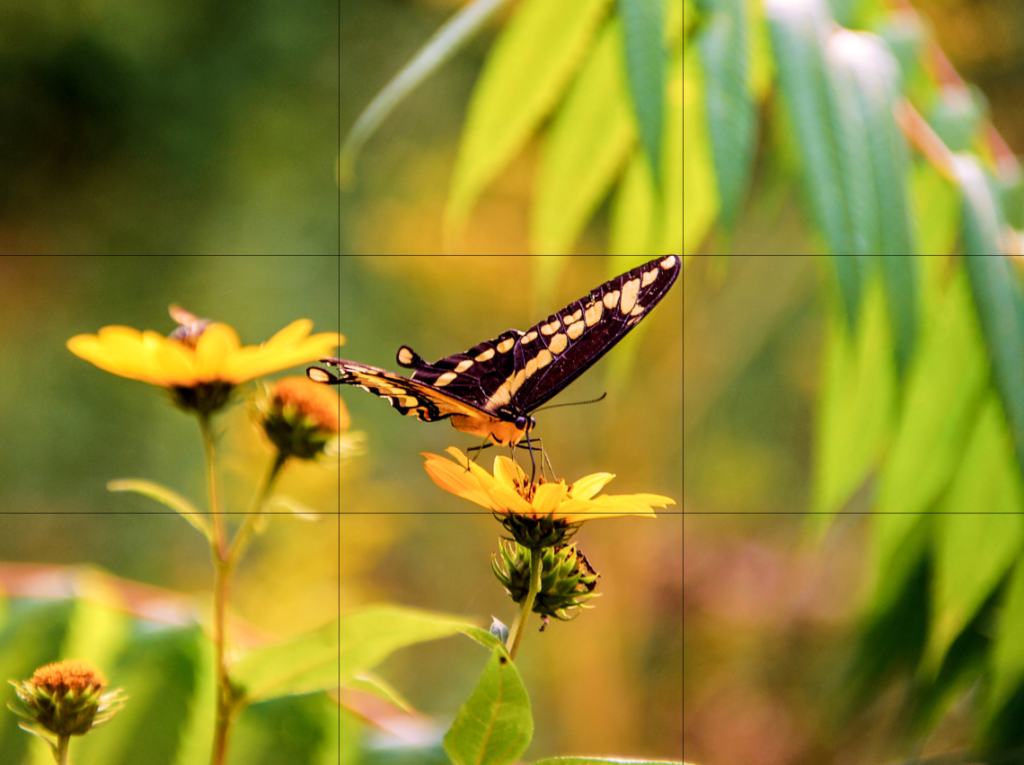
The rule of thirds is the easiest rule to follow and your photos will be so much better if you keep this in mind when framing your photo. If you divide your screen into thirds both vertically and horizontally, there will be four points where those lines intersect. You want the main focus of your photo to be on one of those intersecting lines. Most cameras and cell phones have an option to turn the grid on so you can frame your photos before they’re even taken. I took this photo of a butterfly as an example. In the first photo, I’ve lined up the butterfly with the top right intersection of the grid, and the stems from the flowers naturally divide the photo into thirds. In the second photo, I’ve lined the butterfly up with the dead center of the photo. It feels unbalanced and a little off. Do you notice a different experience when looking at the photos? For me, the first photo takes me through a short journey (called dynamism) where I first look at the butterfly and then follow the stem down and over to the left to the other flowers in the background, and back to the butterfly. The second photo I tend to just look at the butterfly and look away. Studies have been done on this subject and have shown that people’s eyes usually naturally go to one of the intersection points rather than the center of the photo.
10. Golden Hour
Last but not least, let’s talk about golden hour. This is approximately the hour right before sunset or after sunrise. The sun is at a lower angle in the sky and the natural sunlight is redder and softer than any other time during the day. The rays of sunlight have to travel at a greater distance through the atmosphere, which reduces the intensity of the light. We tend to see a much more even distribution of the light, rather than strong highlights and harsh shadows that we see in the middle of the day. Photographers love this time of day and if you go to any beach around here in San Diego during golden hour you’ll see several photographers trying to get their last shots of the day in!
Final Thoughts
And there you have it: 10 photography terms you now know! I hope you’ve learned something and I hope you enjoyed reading this. If you haven’t already, please give me a follow on Facebook and Instagram – more followers and likes helps my posts reach more people through the algorithm! Thanks for reading and I’ll see you next week!
Let’s create some memories.
Kim